HOW TO MAKE A RULER HEIGHT BOARD
I seen this idea on Pinterest some time ago and thought it was a good one, and then just last week decided I would like to make one.
So this morning I set the kids up outside to play in this beautiful Queensland sunshine and I hit the sander...
It was so simple to make and it only took half a day.
Better still I needed not to purchase any materials, they were all here on our property, but you might have to.....
WHAT YOU NEED
:: A piece of pine board (I found mine under our shearing shed and it was ALMOST already cut to size.
:: Varnish
:: Rags
:: Paint Brush
:: Nikko Pen in Black
:: 30cm Ruler
:: Sander
:: Grinder
:: Sprit Level
:: Drill
:: Screws
:: Stencil
:: A hunky husband or tradie to help you with the fiddly bits ;-)
Here's how too:
Purchase your piece of timber {probably pine would be best} this is not any particular length or width, it is what it is and it's about 7 foot {most kids and adults aren't any taller!}
NB:: If you are purchasing your timber from the hardware store you won't need to do this step.
Measure out the width of the board and mark all the way down the thickness.
Join together with Nikko making a straight line. Cutting the along the line with a grinder, sander or jigsaw
Make yourself some smoko .....
Once you've cut the timber straight, give it a sand on all edges and front and back to give it a nice smooth finish.
Using your decking oil, rub into your timber board with a dry cloth or a paint brush, on both sides, not forgetting to do the edges and watch the timber soak.it.up.....
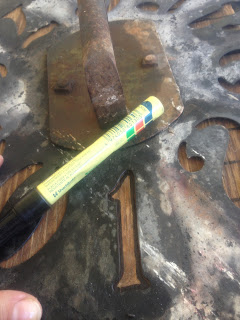
I am lucky enough to have this shearers wool bag stencil on our wall from our shearing shed, so I used it as the stencil for the numbers, but you can download some off the net, make your own in word or buy some from your local art and craft supplies store.
Next step. Prepare your board to the measurements of choice.
I used feet and inches, because it has the nice effect of the larger numbers {and was less lines to draw on the board compared to cm}
Using a Nikko Pen in black is best I think, compared to painting, it iscleaner and is more effective and easier to handle and looks neater in the finish. It stays on well.
Now place your stencil at the end of each bigger line {which will be 'feet'}
It's advisable to trace around stencil first with a pencil or chalk to make sure it's going to be where you want it.
Then, just colour in with your Nikko.....
If you make a mistake using the Nikko pen {see here I had the 1 too close to the foot line and was not even with the rest of the numbers} just use some Metho on some cotton wool buds and dab on the area you wish to 'delete' and it will come off and you can start again.
Now if your a women doing this, this is where your hunky hubby comes in......
Select your desired place for your new Ruler Height Measurer and have him level it out and help you secure it
Once secured, I then added the kids heights from birth until now {only using the month of Februrary as a time we will use it as it is both their birthdays in this month}
I used a smaller marking pen for this so it didn't over power the rest of the measurements on the ruler.
And there you have it - you've just created a lovely new piece for your home for the whole family!
An estimate of cost is $80
An estimate of time is half a day
CREATING A LIFETIME OF MEMORIES


No comments:
Post a Comment
Note: Only a member of this blog may post a comment.